Japanese Knives – Chip Repair

Japanese Knives – Chip Repair

Forged Japanese chef knives can take an amazing edge and hold it for quite some time. The steels used and the hardness achieved are part of what makes these blades take and hold such a keen edge. The one downside to this is they are more brittle than the traditional western kitchen knives. A twisting motion on the cutting board can cause micro-chipping or chopping into a bone fragment can result in a large piece of your edge chipping off.

Getting a chip in your chef knife can be devastating. Hearing the “tink” noise the metal makes when chipping causes a roller coaster of emotions, made even worse if you don’t hear it and have to ditch the product you were prepping. Don’t worry though, that chip doesn’t mean your knife is now useless. Any skilled sharpener will be able to grind it out and get you back to prepping with your favourite knife.

I have a couple recommendations if you have a chipped knife and need it fixed:

  • Find a sharpener who specializes in doing high-end kitchen knives. Not the hardware store who will sharpen whatever you need done.
  • Let the sharpener know things you like about the shape of the knife, how it rocks, the shape of the tip, etc.
  • It doesn’t hurt to also let them know what types of food you will be using it on. This can help determine a few things that will improve performance of the blade.

Lets take a look at some of the steps to fix the chip in this Masashi Koi 210 mm gyuto:

This knife has a rather pronounced belly and the owner holds the knife in a choked-up pinch grip, utilizing the rocking motion most western chefs are accustomed to. This means I will want to try and maintain a similar profile with the tip approximately in the middle of the blade height. Having belly on a blade makes for easier rock chopping but there is no need to go overboard. If there is too much belly and the tip is really high it makes it more difficult for the user to utilize the tip for detail work.

As always the goal is to remove as little material as possible from the height of the blade. So when marking out the new profile you want to just barely touch the top of the chip.

Now it’s just a matter of grinding up to the line. I like to use a stationary block of wood with 120 grit sand paper adhered to it. The technique I use is a sweeping motion from tip to heel, while moving along the length of the sanding block. I hold the knife at a 45 degree angle on both axis while doing this. Making sure to slowly grind up to the line.

The tip was starting to look a little weak so I decided it made more sense to grind down from the spine to form the tip.

Sometimes when grinding out a larger chip from a blade you will reach the point where the cladding is down into the edge. Technically the cladding will never actually be right at the cutting edge if ground properly but it’s best practice to thin the blade if the cladding is down into the bevel.

After thinning I run through my progression of stones finished by stropping on leather to put a razor edge on the blade.

The profile of the blade has changed slightly but we have removed minimal material and kept the profile as true to original as possible. With a fresh coat of wax on the chestnut handle, this blade is ready for action.

If you have any questions please feel free to comment. If you are in the Victoria, BC, Canada area and need your chipped knife fixed, please contact me for a free quote.

Thanks for reading!

Wa-Handle Dimensions and Shaping

Wa-Handle Dimensions and Shaping

When I first started making handles for Japanese knives I didn’t have access to many product examples to compare so I searched the internet for a sizing chart of sorts. It turns out there wasn’t a very detailed one. The best I could find was mainly just “length of handle versus length of blade”, but it didn’t get into any specifics. I kept searching and found pieces of information here and there until I pieced together some good proportions to start testing. You find out pretty quick on prep-heavy days what works and what doesn’t. After a lot of personal experimentation and feedback from others in the kitchen these are my go to dimensions for a Gyuto / Chef knife:

Octagonal Wa-Handle Dimensions

Blade length: 210-270 mm
Handle length: 135 mm
Ferrule end width: 18 mm
Ferrule end height: 23 mm
Butt end width: 20 mm
Butt end height: 26 mm
Chamfers: 5 mm marked in from corner.

I find these dimensions work well for a few different reasons. The handle is big enough to house the tang of the knife without becoming structurally weak or feeling too bulky. The slight taper toward the blade is balanced and gives a good secure grip without giving the feeling your hand is creeping forward. The handle is a good length for fitting a wide range of hands but not long enough that you find it hitting your wrist when doing detail work with the tip of the blade.

Shaping an Octagonal Wa-Handle

I like to use all natural wood for my knife handles, in my opinion there is no substitute for the feel of natural wood for a tool handle. The method for shaping that I’ll be showing here doesn’t require a bunch of fancy machinery or expensive tools.

I should mention that the butt end and ferrule end square (90 degrees) to the top of the handle. This makes the top of the handle in line with the spine of the knife and the bottom face of the handle taper up toward the blade. Both sides taper in from the butt end toward the blade. I account for all of this when doing my layout, which is why you’ll notice my tang slot is up from centre at first.

After glue-up I like to take a couple shavings off the top face of the handle to give me a good reference point for marking out the centre of the handle along with the tang slot.

Once I’ve established centre and marked the tang slot I drill out some pilot holes to start the slot.

At this point I start connecting the pilot holes using the drill at an angle. After that I move on to digging it out with a jig saw blade held with a small pair of vice grips. Then square things up and refine the slot with some small files.

Once the tang is tightly fitted, I begin layout of the handle shape. I find it better to fit the blade before shaping the handle so that when making the tang slot, if I go slightly out of square I can easily adjust the layout to account for it. Going the other way (shaping the handle and then cutting and fitting the tang slot) means it needs to be 100% perfect out of the gate or you’re going to have spend a great deal of time tweaking the fit. More than likely you’ll end up having to bin the handle because you’ll end up with a skewed fit or a slot way bigger than intended.

Working from my top reference face, first I mark the 18 mm wide, 23 mm tall ferrule end, followed by the 20 mm wide, 26 mm tall butt end.

Now I just plane down to my layout marks and I have established the dual taper of my handle.

Some people only eyeball the chamfers but I find it beneficial to have a visual aid of what I’m shooting for. It can be pretty difficult to mark out the chamfers accurately, which is probably why most people do only eyeball it. I made a handy little guide out of a scrap piece of walnut that gives me perfect 5 mm chamfers every time.

Once I have my chamfers marked I use my hand plane to remove material down to the line. I hold my plane in one hand and essentially use it like a mandoline (kitchen tool). The most import thing is to pay attention to grain orientation. It can look a bit wonky and be harder to keep track of once you’ve started. Lose track of it and you will quickly ruin your handle and have to start over.

At this point I’ll lap all the faces on a 320 grit sanding block. Then I’ll sand a small chamfer on the edge around the butt end and the ferrule end. This handle is now ready for finishing. My go-to for finishing woods that aren’t naturally water resistant is 100% pure Tung oil, followed by my custom wax polish.

I use epoxy to mount the blade and this knife is now ready to be put to work.

wa-handle by Colton Organ
wa-handle gyuto with saya by Colton Organ
Shun Classic Rehandle

Shun Classic Rehandle

Shun knives are quite popular in commercial kitchens. They’re very durable and usually treated as such. This early model Shun Classic 10 inch chef knife has seen hard use and better days. The blade is pretty badly curved and has seen frequent sharpening. The resin impregnated wood part of the handle is also twisted out of it’s seat. Let’s see what kind of shape we can bring this knife back to.

I had a different idea initially but due to the design of the “tang” the plan is to re-handle this knife using the existing D shape bolster and end cap as a guide. This knife has been retired for a while now and the owner doesn’t like how high the tip has been ground over it’s life. So in addition to thinning this knife behind the edge I will also re-profile the blade.

I marked out my stock for the handle and started drilling the holes to fit the “full composite-tang.” A method of tang construction I’ve never seen before. I imagine this is how all of Shun’s knives are constructed. I roughed out the D shape of the handle before assembling with epoxy.

Using a metal file I flushed up the wood and steel of the handle. Opposed to using a sandpaper block which just grinds the metal dust into the wood. Once I was happy with how the handle felt in the hand I moved on to finishing. I’ve been trying out Boiled Linseed Oil finish on my handles and with lots of coats it seems to hold up very well. It is not a film finish so you still get the feel of the wood in your hand. Unlike mineral oil, it is a drying oil so it does cure and this particular stuff is food contact safe.

I sharpen all my knives on a progression of Naniwa Professional Stones. Followed by stropping with 0.5 micron honing compound. That’s taking it to approximately 30,000 grit. Totally unnecessary since it won’t hold it very long but does it ever sing.

Poplar Saya for Shun Kiritsuke

Poplar Saya for Shun Kiritsuke

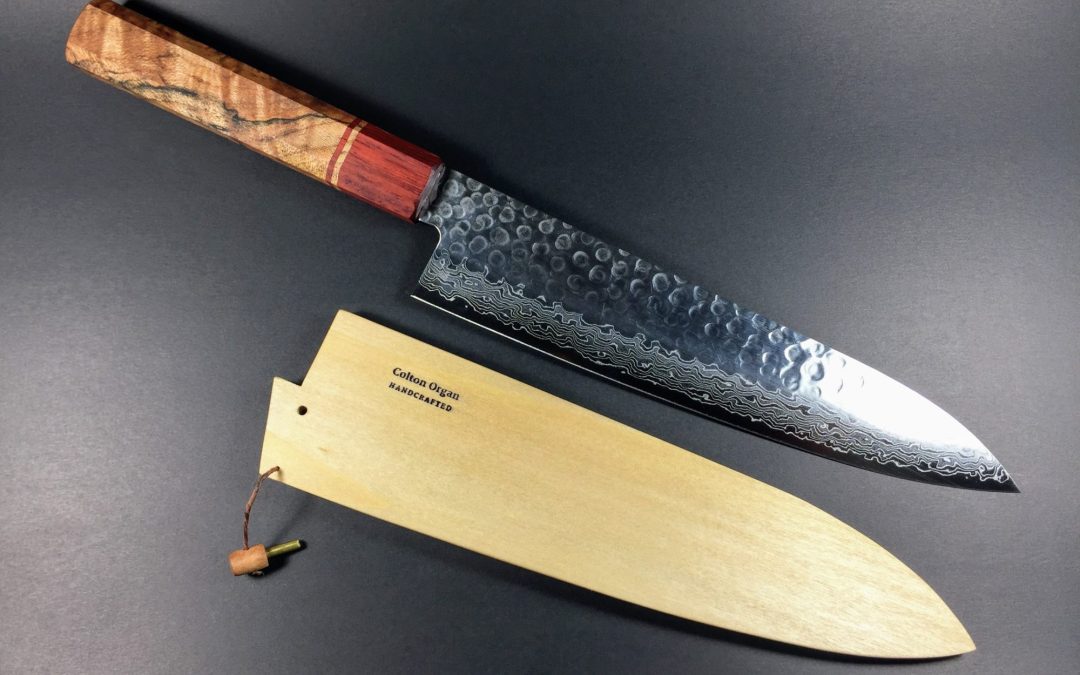
This Poplar saya is for a Shun Kiritsuke 8 inch. I was playing around with thicknesses on this saya to dial in exactly how thick will give good protection but not look too bulky. This is an example of the Poplar sayas I will be offering for sale.

Cedar and Poplar Saya

Cedar and Poplar Saya

Saya is the Japanese term for a scabbard or sheath specifically for a sword or knife. While researching the design and construction of these I discovered the main complaint about them was losing the retaining pin that keeps the knife locked inside. So I came up with a way of tethering the pin to the saya. Not a new idea but it functions well and suits the style of construction.

The method of construction is lamination. For this particular saya there is three layers. Poplar on the outsides and cedar on the inside. The retaining pin is made of Arbutus. All using traditional hand tool methods. The only time a machine came into play was for drilling the holes. The finish is Boiled Linseed Oil.

Rehandle a 150mm Petty

Rehandle a 150mm Petty

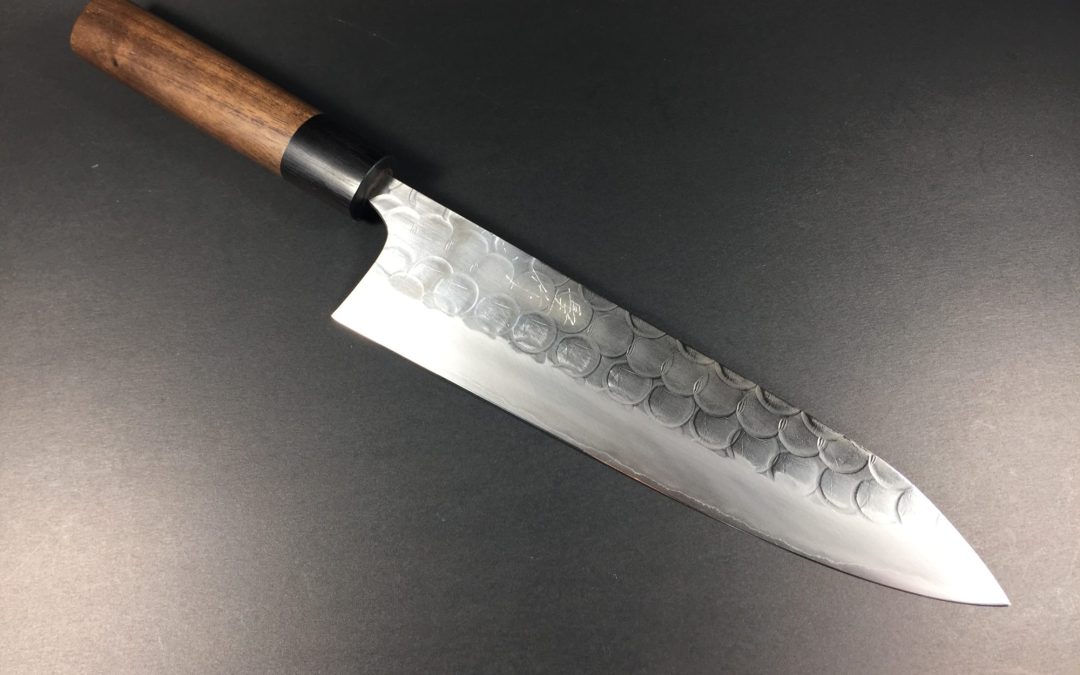
This is the Tojiro 150 mm petty that I purchased along with the 210 mm gyuto. I decided to go with a slightly different handle configuration using the same woods. The saya is constructed of Poplar and painted with black milk paint.

Milk paint is made using milk protein, lime and earth or mineral pigments. It is environmentally friendly and non-toxic. It has been used for hundreds of years on furniture and in the past families typically had their own recipe they would pass down through the generations. It is water based so it doesn’t just form a layer on top of the surface that can chip off. It gets into the pores of the wood more like a stain than modern paints.

Handle Dimensions:
Overall Length: 110 mm
Width: 15 mm
Height: 22 mm
Ferrule: 10 mm